
Oven Baked Clay & Burlap Garland
Valentines Day is quickly approaching. Do you decorate for Valentines Day? I rarely do…but I love making things for Valentines Day…for my daughter and friends that LOVE (pun intended) to decorate. I do occasionally put out a small decoration. But banners and garlands got big…and I adore them! I think I could actually hang them all over my house. This might be the new me…decorating for Valentines Day. I’ve made several garlands…some you’ll see here…and some on Deja Vue Designs. This one, is my favorite so far. It really looks adorable with my little “love” easel backed art from last year….so that will be sitting around this year again.
I really the hand-made feel that this garland has. I don’t do refined….or prissy much. This is pretty much…my style. This oven baked clay and burlap garland was really easy to make…so let do this…shall we?
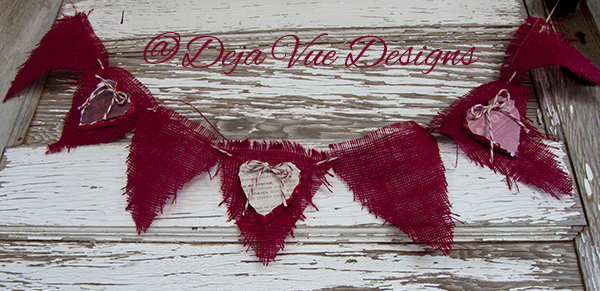
Mine, took on a Red feeling…but really, it could be made any color…so if you’re into softer colors…just change up some of the elements…and you’ve got a whole new feeling.
Supplies:
Scissors
1/4 yard fabric of your choice…or more, depending on how many triangles you want to make (guess what? The triangle pattern from my Rusty Star.…would probably…work Great for the triangles….head over and grab that if you like!)
Something for the string…so twine, yarn, ribbon work. I used a twine like textile from the yarn isle at Wal-Mart.
1/4 sheet of three different scrapbook papers…or any paper you like…one for each heart you make.
Oven baked clay. I got mine at Hobby Lobby…but I’m sure they sell it in any craft store.

To make these…grab your oven baked clay,

Tear off one to two sticks…depending on how big you want your hearts…if you don’t like the size…start over…simple enough
working it in your hands…shape it. I like mine really rough, keeping that hand made look…I love the ripples where my fingers pressed it. if you don’t…you might want to use a rolling pin…or craft roller.

After getting them like I wanted…I made sure that they weren’t stuck to the pan. All the instructions on YOUR particular clay should be followed.
I broke a toothpick to make the holes in the clay for the string to go through. I broke it…to give me a little larger tool…square vs. point.

by sliding it gently back and forth in the clay…it forms a “slot” so to speak…in case you want to used ribbon, instead of something round like my twine.

You might find that your clay wants to fall apart just a bit while you’re doing this…be gentle..and you can always press it back into place. My particular clay says you can drill it once it’s baked…but I felt like most of my readers would want to do it this way…so that’s how I did it. If you own a drill and are comfortable…I prefer that method.
Once the Clay was baked and cooled…I spray painted mine. I didn’t want the edges white…but it’s not a must…if you like the white look

I gave mine enough time to get just tacky…so that I could “skip” the modge podge part…but if you don’t want to mess with sticky paint…wait…and follow the directions on the modge Podge bottle on placing your scrapbook paper.
I just stuck mine down…and tore the edges…another “hand-made” element.

I didn’t worry about being perfect…and I love that I didn’t get wrapped up in that…sometimes I do…and I’m not sure why…I always like the “rougher” look.
Now…cut your triangles…and lay it out to get your layout.

When I’m running my string through, I wrap the end with a piece of tape…this makes it just firm enough to get it through the burlap…and keeps the ends from fraying.

I frayed the edges of my burlap…to add to the rough texture.

I tied a little bow for the middles of my hearts…and hot glued it on. You could hot glue everything together…if you don’t want to weave the thread…or even poke holes in your hearts, for that matter.
I just love the look of the hearts with the scrapbook paper….and believe it or not…these were all scraps that I had from other projects….LUCKY! 😀
Again…looks fabulous on an old chippy door….among other places…it looks good on the fireplace too…:D

So…would you make yours rough….or refined?

Either way…I think it would be darling!

You can find me all these ways…


This is SO perfect for Valentine’s Day, Tammy! Love it – especially all of the different textures!
Laura / Pet Scribbles recently posted…Celebrating Everyday Life with Jennifer Carroll: Valentine’s Day edition!
Thanks Laura…really fun to make! Have a great week!
Tammy Killough recently posted…(Quick and Easy Valentines Day Gifts)
You create the most amazing things, Tammy! I love this.
Mary Beth|Cupcakes and Crinoline recently posted…Croissant and Honey Bread Pudding with Mock Custard Sauce
Thank you Mary Beth…I could say the same thing about you!
Tammy Killough recently posted…A Man Who Reads…Printable